9/30/11

Field Trip: North Plain Farm

This past Saturday we took a beautiful morning hike through the just-turning Berkshire hills. It wasn't until we arrived home famished that we realized we'd missed the Great Barrington Farmer’s Market- which, while it’s one of our favorites, has pretty limited hours. Luckily, Western Mass is full of farms with convenient shops right at the source, so we jumped in the car and drove down to our friend Sean Stanton’s North Plain Farm. 

There are a lot of amazing farmers in the Berkshires- and as time goes by you'll be introduced to most of them- but Sean is one of our favorites. He is a young and tireless farmer who we got to know because Jake’s brother Sam worked on his farms throughout high-school. Besides North Plain Farm which he owns and runs on his parents' property in Great Barrington, he manages Blue Hill Farm for the internationally famous locavore chef Dan Barber, in Monterrey, MA. That's right, two farms!

Sean joined the US Coast Guard after school, realizing in just a few years that rather than serve ‘"his country" he wanted to serve the community that raised him. So he moved back to Western Mass and started a small farm on his parents' property. All of his livestock - chickens, pigs, lamb, and cows - are pasture raised. He feeds them with organic feed, rotates pastures frequently and always has one kind of animal cleaning up after another. He is now a Town Selectman, a pillar of the community, and a prime model for he future of successful sustainable farming. 

Like most active farms, North Plain Farm is not the beautiful pastoral sight you might see in Sauveur or Town & Country. As you pull into the lot you are greeted by Marie the retired farm dog, as she runs around rusty tractor parts waiting to be refurbished, empty milk crates, and a chicken slaughtering trailer used the day before. (P.S. those chickens were GOOD!) Broilers wander around in their hoop houses, and large heritage breed pigs (Tamworth, Large Black, Berkshire, and Gloucestershire Old Spot) wallow in mud and eat rotten apples along side the cutest piglets ever. Tomatoes grow in weather-beaten hot houses and apprentices busily run around taking care of their respective tasks. 
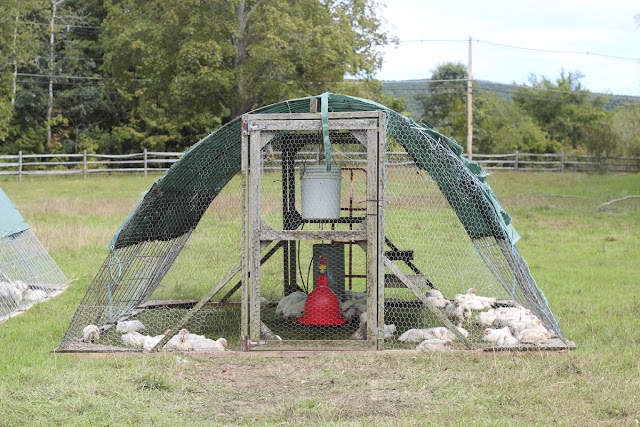
When people find out about our plans to move to the country and start a small farm, often they imagine our lives as leisurely gentleman farmers. But by visiting North Plain Farm and talking with Sean, it's easy to see that real farming is not a glamorous or romantic - and sometimes not even fun - job. Sure, we'll be escaping our 9-5 office jobs, but we will be entering the 24-7 life of maintaining land and livestock.

For us, the most important thing to take from Sean's example is how clearly his hard work pays off. He is providing an example for future farmers, feeding his neighbors with healthy, well-raised food, and is actively involved in local politics, helping to create laws that protect land. And once in awhile he can sneak away with his girlfriend to one of the best restaurants in NYC to be served food he produced - even if he still has to run back the same night to milk cows at 4am.

9/27/11

Recipe: Summer-into-Fall Beet Salad

We've been so preoccupied with mid-summer produce like sweet corn and zucchini, we almost didn't notice the bunches of deep purple and yellow beets that have started to take over the market. Thankfully, we didn't miss our chance! There's still plenty of time to take advantage of the long beet season, and believe us we will, because we love beets. Silka loves roasted beets almost as much as she loves mashed potatoes (read: a LOT) but Jake takes it to a whole new level. As a kid he loved beets so much he decided to marry one, drawing a portrait of himself and his beet bride. Don't believe us? It still hangs in his grandparents house.

For our first taste of beet season, we looked to a classic boiled beet and goat cheese salad- but we really wanted a hardier dish that would bridge the end of summer and the beginning of fall. Making it up as we went along, we picked up some brebis blanche from 3-Corner Field Farm, micro greens from Two Guys in Woodbridge, and a handful of herbs from our terrace to add a summery touch. On the other side of the seasonal spectrum, we thought a grain like farro could really bring in an earthy, fall flavor. We went to our favorite local grain source, Cayuga Pure Organics, and described what we had in mind. The young woman working the table suggested wheat berries. We'd never cooked with them before, but trusting her expertise, we decided to try it out.

Well, big thanks to the chick at Cayuga for introducing us to our new favorite grain! The boiling wheat berries filled the kitchen with a sweet, nutty flavor and we immediately knew that they'd compliment the sweetness of the beets and the grassy tang of the goat cheese perfectly. We served the salad with a lamb chop and a green salad for a beautifully simple weeknight dinner. 

Summer-into Fall Beet Salad

+ 2 lbs beets, peeled and cut into big chucks
+ 1 cup of wheat berries
+ a bunch of greens and herbs - we used parsley, mint, micro radish greens and micro watercress
+ 6 oz Goat or Sheep cheese
+ 3 tbsp olive oil
+ salt and pepper

1. Soak the wheat berries in a sauce pan with 4 cups of water for 2 hours. Meanwhile pre-heat the oven to 400.
2. Spread beets out in a large baking dish, pour olive oil over them and sprinkle with salt. Put into the oven for one hour.
3. Bring the water and wheat berries to a boil and then lower to a simmer and cover, just like rice. Cook covered for one hour.
4. Meanwhile, chop up the greens and herbs, and crumble the cheese in a large serving bowl. When the beets and wheat berries are done, mix everything together in the bowl and serve. 

9/25/11

Sunday Dinner: Roast Chicken with Collards, Mashed Potatoes and Raspberry Gallette

Whenever we visit Jake's family in the Berkshires, we look forward to cooking them a big meal. Like us they are food-obsessed, and it only seems fair that we contribute, given their 18+ years of cooking for Jake and his two brothers.

This last visit was timed perfectly with the height of Jake's father's harvest- so we knew his huge collard greens would be a major component of the meal. From there we headed to our friend Sean Stanton's North Plain Farm where we picked out our protein. As we arrived, two of Sean’s apprentices entered the Farm Store carrying a full load of beautiful, yellow-skinned, pasture-raised chickens that had been slaughtered the day before- the evidence of which was in the driveway. Well, we knew we couldn't get much fresher than that. And talk about local! The remainder of the broilers were scratching around in the field right outside. We left with three chickens to roast, plus some of Sean's perfectly porky bacon to cook with the greens. 


Jake’s parents always have a sack of potatoes laying around from their friends at Foster Farm in Sagaponack so we thought we might as well round out the meal with some creamy mashed potatoes. As we were busy foraging for produce, Jake's mother was picking hundreds of raspberries from their bushes for a TBD desert. With all our ingredients in order, we got cooking.


This was a simple meal to prepare and it couldn't have been more satisfying on a brisk early-Fall day after a beautiful morning hike and an afternoon of local harvest. The chicken was incredibly juicy and- unlike what you get from the supermarket- tasted really chicken-y. The collards were sweet with a strong irony flavor and delicious hints of porky goodness while the mashed potatoes were buttery, creamy and oh so filling. But the impromptu raspberry gallette was the highlight, with handfuls of peaked fruit tucked into a light flaky crust. But that's a recipe for another post!

Roast Chicken with Gravy

+ 1 3-4 lb Chicken, pasture raised with giblets
+ ¼ cup of butter, softened
+ a bunch of herbs: thyme, rosemary, parsley, sage or whatever you have
+ 4 garlic cloves, crushed
+ 1 medium yellow onion, halved
+ salt and black pepper
+ ½ cup all-purpose flour

1. Preheat your oven to 500 with a cast iron pan or a clay baking dish in it. (If you don't have either, a large all-metal pan or a Pyrex baking dish will work.) Check to see if the chicken has any giblets in its cavity, hopefully it does. Take them out and set aside.
2. Dry off the chicken with a towel and make sure you immediately put the towel in the laundry basket. Try to gently separate the skin from the breast. You don't want the skin to tear, so don't force it. If you’re successful tuck a couple of cloves of garlic in the crevice between the leg and the breast (on each side), along with a few tablespoons of butter and some of the herbs.
3. Spread the rest of butter all over the top of the chicken then salt and pepper heavily. This is what give a roast chicken that great golden brown crust. Stuff the inside cavity of the chicken with half an onion a couple of garlic cloves the rest of the herbs.
4. Place the chicken, breast side up in the hot pan and put it in the oven.
Meanwhile- if you have them- brown the giblets in a small sauce pot with salt and pepper. After they are nicely browned add a 1 ½ cups of water, the other half an onion, and a pinch of salt and pepper. You can also throw in a carrot or celery stalk if you have them. Bring it to a boil and keep it at a hard simmer while the chicken roasts, adding more water if needed.
5. After 15 minutes turn the oven down to 350.
6. Check the chicken after 45 minutes. If you want to use a thermometer stick, it should read 165 when stuck into the breast. Our preferred method is shaking its leg. If it shakes loosely and clear juice runs out, it's done. When it's done take the chicken out of the pan, tipping it slightly so all of the inside juices can run out into the pan. 
7. Place the chicken on a carving board and let it rest for 10 minutes before serving.
Bring the giblets to a medium heat. Strain the the stock from the giblets into the pan and whisk together with other juices. As you whisk, slowly add flour to your desired thickness. Be very careful- you can't "unthicken" gravy.

Collards with Bacon

+ A bunch of collards - they cook down a lot
+ 8 oz bacon
+ ½ cup of Organic Apple Cider Vinegar - we almost exclusively use the Bragg Organic brand
+ salt and pepper to taste - red pepper flakes are good, too

1. Bring a large pot of water to boil.
2. Go through the collards removing the thick part of the stems. Blanch the collards in the boiling water. Take them out after 3 minutes and run them under cold water to stop the cooking.
3. Cut the bacon up to what ever size you like - as you've probably learned, we like big chunks.
4. Fry the bacon in a large saute pan. When the bacon is pretty browned and crispy, throw in the collards, the apple cider, and some salt. 
5. Cook for about 20 minutes, stirring frequently. Some people like them with more bite then others, so just keep checking until they reach your desired tenderness. Sprinkle with salt or red pepper flakes and serve

Jake's Creamy Mashed Potatoes

+ 2 lbs of Yukon Gold potatoes, quartered - we like Russets as well
+ ¼ cup butter, cut up in chunks
+ whole milk - non-homogenized or raw if possible - or cream
+ salt and pepper

1. Bring a large pot of water to boil and throw in the potatoes.
2. Meanwhile put the butter in a large bowl or the mixing bowl of a standing mixer.
3. After about 20 minutes check to see if the potatoes are tender by sticking a fork in them. When the potatoes are done, drain.
4. Add the hot potatoes to the butter. If you are using a standing mixing use your whipping attachment and start mixing on a low setting, adding the milk or cream slowly until you get your desired consistency. We like it chunky, but rich. You can just as easily mix everything together with a masher, big serving fork or spoon. Add salt and pepper to taste and serve.

9/22/11

B + B on Sacramento Street

Photos by Material Lust
Big thanks to our good friends at Material Lust for writing and photographing an awesome feature on us for the lovely Sacramento Street!

See the post here!

9/21/11

Recipe: THE Brownies

While we've been consistently cooking and baking for about 10 years between us, in most cases we still haven't found that perfect recipe. We're always pulling out the cookbooks in search of a simpler, more classic, or more delicious version to try next even if we've made the dish many times before.

But not when it comes to brownies! Hands-down, Nick Malgieri's "Supernatural Brownies" are our absolute favorite. Fudgy, moist, easy and definitely better the 2nd and 3rd days!

Nick's "Supernatural" Brownies

+ 16 tbsp. unsalted butter, plus more for greasing
+ 8 oz. bittersweet chocolate, cut into 1⁄4" pieces
+ 4 eggs
+ 1 cup sugar
+ 1 cup firmly packed dark brown sugar
+ 2 tsp. vanilla extract
+ 1⁄2 tsp. fine salt
+ 1 cup flour

Simple recipes are a great opportunity to let good quality ingredients sing. We use Scharffen Berger chocolate, Muscovado sugar, farm fresh butter and eggs. 

1. Heat oven to 350°. Grease a 9" x 13" baking pan with butter and line with parchment paper; grease paper. Set pan aside.
2. Pour enough water into a 4-quart saucepan that it reaches a depth of 1". Bring to a boil; reduce heat to low. Combine butter and chocolate in a medium bowl; set bowl over saucepan. Cook, stirring, until melted and smooth, about 5 minutes. Remove from heat; set aside.
3. Whisk together eggs in a large bowl. Add sugar, brown sugar, vanilla, and salt; whisk to combine. Stir in chocolate mixture; fold in flour. Pour batter into prepared pan; spread evenly.
4. Bake until a toothpick inserted into center comes out clean, 30–35 minutes. Let cool on a rack. Cut and serve.

9/19/11

Sunday Dinner: Braised Pork Butt in Milk with Cornbread and Summer Squash & Cherry Tomatoes

We relish our weekends because that's when we get to try out the more elaborate and involved meals we've been dreaming about all week. Since we love to entertain, more often than not these "Sunday Dinners" turn into leisurely (and fairly bacchanalian) evenings with hungry friends.

Whether it's a seasonal vegetable side or a 12-hour roast, we usually start our weekend menu with one particular dish and build the rest of the meal around it by wandering around at the Green Market. On special occasions- or when we think ahead- we'll order a special cut of meat from our friends at Fleisher’s Meats

For the first of our Sunday Dinner posts we'd like to share a meal we made for our good friends Christian and Lauren of Material Lust. They came over to our apartment to shoot photos for a feature they are writing about us on one of our favorite blogs, Sacramento Street. 


For the shoot, Jake did a butchering demo and since we don't exactly have enough room to cut up a whole animal in our apartment, he de-boned a pork butt instead (actually the pork shoulder). With our freshly cut butt we decided to make a classic and extremely simple Italian dish- Braised Pork Butt in Milk. Sounds weird, but it's so good. As the butt cooks the fat melts out and mixes with the milk, slowly condensing and curdling into a rich nutty brown gravy. As with any braise, the pork becomes incredibly moist and tender, and it takes on the delicate flavor of the milk.

With that dish in mind, Silka baked a corn bread recipe she's had her eye on for a while and we roasted some yellow summer squash with cherry tomatoes from Migliorelli's. And for a salad, we picked up some luscious greens from Two Guys from Woodbridge. 

Since the meal is pretty heavy and we were all exhausted from a day of shooting and cooking, we topped the meal off with our favorite, Bulleit bourbon on the rocks.


Pork Butt Braised in Milk
Adapted from Marcela Hazan's Essentials of Classic Italian Cooking

+ a 2-3 lbs boneless pork shoulder/butt with cross-hatched skin
+ a quart of milk - non-homogenized or raw if you can get it
+ bay-leaves, peppercorns, juniper berries, and nutmeg (optional)

1. In a heavy cast iron or enamel dutch oven, heat a couple tablespoons each of butter and olive oil over high heat. When the butter stops foaming add the pork, skin side down. When it's browned turn the pork from side to side, a few minutes per side.
2. When the pork is browned on all sides, pour in two cups of milk. If you want you can also throw in a few bay-leaves, 5 whole peppercorns, 5 juniper berries, and some grated nutmeg. 
3. Bring the milk to a simmer then turn the heat to low and cover with the lid slightly ajar. Check the pork every now and then, turning it onto a different side. 
4. After about an hour the milk should be curdled and look like a nutty brown sauce. At this point add another cup of milk and turn the heat to medium-high. Let the milk simmer for 10 minutes then turn the heat back down to low and cover completely. 
5. Let the pork cook for another two hours or so, checking and turning occasionally. You should add more milk if all the liquid boils off.
6. When the pork is tender and falling apart, take it out and place in a glass baking dish or an all-metal pan. Put the pan and pork under the broiler, skin side up, until the skin is crisped golden brown- about 3 minutes. Make sure to watch the pork carefully, as it can burn easily and quickly.
7. Meanwhile bring the sauce left in the dutch oven to a boil, adding a few tablespoons of water. Stir until the water is incorporated and you have a nice gravy.
8. Serve the pork covered in the sauce.


Yellow Summer Squash with Cherry Tomatoes

+ 4 medium sized summer squash or zucchini
+ a pint of cherry tomatoes
+ olive oil
+ salt and pepper

1. Preheat the oven to 400.
2. Slice the summer squash lengthwise about a ¼ in thick. (A mandoline is perfect for this.)
3. Lay the squash down in the baking dish. Don't be afraid to overlap them. Throw the cherry tomatoes on top and drizzle olive oil all over - 1-2 tablespoons. Sprinkle with salt and pepper.
4. Bake for an hour, or till the squash is translucent and golden and the cherry tomatoes are puckered and bursting with juice.


Sour Cream Cornbread with Aleppo

9/15/11

Recipe: Carbonara with Fettucine

Carbonara is the best meal because it's cheap, easy, and filling. It's one of those things we make when we don't feel like going shopping but want a nice home-cooked meal, which is- let's face it- often. The basic ingredients are eggs, cheese, bacon, and pasta, all things we always have laying around. We generally try to make our own pasta, but this night we were pressed for time so we ran over to Eataly (another place we're lucky to live by) for some fresh Fettuccine. We're not going to lie- fresh pasta makes it SO much better. But this dish is fantastic with boxed pasta too. 

Because the recipe is so simple, we had fun improvising with the ingredients. We had some bacon ends in the freezer (the not-so-pretty-but-cheaper-and-just-as-tasty part of bacon) so we chopped it up into nice chunks of lardon, which added great texture. We also wanted to use a local cheese, so we tried an aged cows milks cheese from Cato Corner Farm called Bloomsday. It was deliciously nutty and a lovely substitute for the traditional Italian cheese. If you're unsure, it's always a good idea to ask the cheese monger- they know what they're talkin' about, and more often than not they'll hand over a few samples!

All in all this meal took about 10 minutes, from start to finish. We'd say: 10 minutes well spent!  

Carbonara with Fettuccine
Adapted from Saveur.com

+ 4 tbsp. extra-virgin olive oil 
+ 4 oz. bacon ends - we got ours from Flying Pigs Farm at the Union Square Greenmarket
+ 2 tsp. freshly cracked black pepper, plus more
   to taste
+ 1 3⁄4 cups finely grated Parmesan, or similar - we used "
Bloomsday" cheese from Cato Corner Farm
+ 1 egg plus 3 yolks - because they will be eaten raw-ish, it's best to get farm fresh eggs
+ salt, to taste
+ 1 lb fresh fettuccine


1. Boil water for the pasta while you prepare the rest of the recipe.
2. Cut the bacon ends up to whatever size you like. We like them on the thicker side- 1 inch strips and ¼ thick. Fry the bacon to your desired crispiness and in the last two minutes throw in 2 tsp of black pepper and a dash of red chili flakes. 
3. Remove the bacon from the pan, along with a little bit of fat, and put it in the dish you'll be serving the pasta in. (You can pour the remainder of the bacon fat into a small Pyrex container or old coffee tin and keep it in the fridge for the next time you need to fry something up.) 
4. In a separate bowl whisk one egg with the three egg yolks and stir in the grated cheese. Pour that mixture into the serving bowl with the bacon.
5. Cook the pasta, making sure to pay special attention to the directions on the package. (Fresh pasta only takes 3 minutes or so, while boxed pasta takes around 8 depending on the shape.) 
6. Drain the pasta when it's ready, reserving a little water. Mix the pasta into the serving bowl and toss with the rest of the ingredients. Add more salt and pepper to taste. Feel free to add a little of the reserved pasta water if you feel the sauce needs thinning out. 

Serves 4-ish.

9/9/11

Recipe: Grazin' Angus Burger with Chip’s Ranch Dressing

When we asked Chip from the Union Square Greenmarket what his favorite thing to make with his own Grazin’ Angus beef was, he listed a few things before admitting, "Ultimately, it's a burger." He loves a Grazin’ Angus burger so much that, as we mentioned before, he and his father-in-law are opening up a burger joint in Hudson, NY.

He likes to serve the burger "black and blue" (a heavy sear on the outside and rare in the middle) with caramelized onions and good local blue cheese or with homemade buttermilk-ranch dressing. We were pumped about the prospect of the homemade ranch because we love anything made with buttermilk or mayonnaise. So we got a pound of ground meat from Chip and some Coach’s Cultured Goat Milk and headed home to try it.

Black and Blue Burger

+ 1 lb of ground meat - grass-fed if possible!
+ salt and pepper
+ 3 tsp of butter

1. Preheat the oven to 350.
2. Take the ground beef and fluff it up a little without over working it. Lightly form it into 3 ⅓ pound patties, each about an inch thick.
3. Take a teaspoon of butter and gently press it into the middle of each patty, covering it back up with a little meat. Now salt! Don’t be thrifty with the salt if you want a nice crust. Pepper both sides.
4. Turn your pan (cast iron if possible) on high and wait until it's very hot. Sear patties on each side for a minute, until you have a nice deep brown crust. 
6. Stick the whole pan in the oven for 5-7 minutes. If you're not sure if the burgers are done, poke them. If they spring back but don’t give too much resistance they are done.

Buttermilk Ranch Dressing

+ 1 cup of homemade mayonnaise
+ 4 cloves of garlic, minced
+ ½ cup of buttermilk - we used cultured goat milk because we like it's tang and grassy flavor but regular buttermilk works just as well.

1. Mix the garlic into the mayo. Add the buttermilk to taste, one tablespoon at a time.

Chip was right, this was an amazing combination. The intense beefiness of the grass-fed burger combined the the tang of the buttermilk and sharpness of the garlic was out of this world. It was especially fantastic on a (somewhat flattened) homemade burger roll with a slice of late summer tomato. Thank you, Chip!

9/7/11

Market Interview: Grazin Angus Acres

For our first Market Interview we wanted to talk to someone we really admire and who's product is truly exceptional. The obvious choice was Chip from Grazin’ Angus Acres, a grass-fed Black Angus beef farm in Ghent, New York. Chip is at the Union Square Green Market Fridays and Saturday’s selling beef, pasture-raised eggs and chicken. Their beef is out of this world! It's easily the best beef we've had anywhere. It has an intense beefy flavor, a grassy finish and the perfect amount of chew- sounds like we're describing a wine, right? Well it's that good. Our favorites are the Sirloin, Hanger, and Flap steaks, and the ground beef. We always keep a steak and ground beef in the freezer. 

Chip is a warm and energetic man who's favorite part about working the stand is "talking to people shopping at the market and helping them eat better.” The farm is all about transparency so when we asked him how they got started, he launched right in... 

After September 11th, Chip's father-in-law Dan decided their family needed a change, so they ventured upstate and bought a dairy farm. Not knowing what to do with it they held on to the farm managers, Jim and Ilene Stark, made them partners, and they started selling Black Angus as seed stock in auctions. One day a friend asked how their livestock was raised and Dan explained that they were grass-fed and pasture raised. The friend had two autistic children and was concerned that industrial food had played a part. He then asked Dan if he would be willing to sell the beef, suggesting that Dan read The Omnivores' Dilemma. With his curiosity piqued, Dan went out the next day, bought the book and then read it 5 times in the next 3 weeks. 

In the four years since, Grazin' Angus Acres has operated as a 100% grass-fed and hormone/antibiotic free beef farm, using sustainable farming techniques employed by Joel Salatin. They are also proud to be Animal Welfare Approved.

When we asked Chip- formerly a successful IT guy in Midtown- how he got involved with the farm he laughed. As soon as Chip asked Dan for his daughter's hand in marriage, Dan started prodding him about joining the family farm. At first Chip couldn't imagine leaving his urban life, but he soon found himself moving closer to Ghent. Motivated by the dream of opening a farm-to-table restaurant, he started working for the family by manning the stands at markets. And now, after years of planning, they'll finally be opening a diner this month serving all Grazin' Angus hot-dogs and burgers in Hudson, New York!

Grazin' Angus can be found on Fridays and Saturdays at the Union Square Greenmarket and on Sundays in Brooklyn on Carroll Street between Smith and Court and in Manhattan at the Museum of Natural History Market. If you can't make it to a market, you can always write to them with special order's or questions.  

Hear the complete interview here: