Showing posts with label Baking. Show all posts

3/23/14

Recipe: Citrus Curd Layer Cake

There is nothing that captures the essence of a season quite like ripe fruit. Sweet berries in the spring, juicy stone-fruit in the summer, crisp apples in the fall, and tangy citrus in the winter. We always have an overflowing bowl of seasonal fruit sitting on our kitchen table, lest we waste one single moment of the limited-time-only bounty.

This is a bit of a new revelation for us, though. When we were living in New York City, doing the bulk of our shopping at the Union Square Farmers Market, we never bought much citrus – as you know it doesn't exactly thrive in the Hudson Valley or Northern Pennsylvania. But now, with Jake working at the Berkshire Co-op, we have fully embraced winter citrus, and all of the refreshing flavors and vibrant colors that come with it. Just because it's not in season here in the Berkshires doesn't mean it's not in season, and grown organically, somewhere else!

Along with our new love affair with winter citrus, we've taking up a healthy obsessed with making citrus curds. After much experimentation, and with a rainbow of curds sitting in our fridge, we realized we had to do something to show them, and our hard work, off. So off we went to make a open-sided, citrus curd layer cake. Using Smitten Kitchen's 1-2-3-4 Cake as a base, we stacked up stripes of Meyer Lemon and Blood Orange curds, and whipped cream. Finished off with a Pomello-Lime glaze and a sprig of mint, we created a show-stopper of a cake. If we do say so ourselves.

Citrus Curd
+ 3 to 4 Meyer lemons or 1 to 2 blood oranges
+ ½ cup sugar
+ 2 large eggs
+ 1 stick unsalted butter

1. Finely grate 2 teaspoons of zest and squeeze ½ cup of your chosen citrus juice.
2. Melt the butter, and let cool.
3. Whisk together zest, juice, sugar, butter, and eggs in a metal bowl and set bowl over a saucepan of simmering water. Cook, whisking constantly, until thickened and smooth.
4. Force curd through a fine sieve into another bowl. Cool, covered, in the refrigerator.

Citrus Glaze
+ 1 cup of confectioner's sugar
+ ½ cup citrus juice (we used Pomelo and Lime)
+ 1 tsp citrus zest

1. Whisk ingredients together until smooth

1-2-3-4 Yellow Cake 
Adapted From Smitten Kitchen

+ 1 cup (2 sticks) butter, at room temperature
+ 2 cups sugar
+ 4 eggs
+ 3 cups sifted self-rising flour
+ 1 cup milk
+ 1 teaspoon pure vanilla extract

1. Preheat oven to 350°F.
2. Using an electric mixer, cream butter until fluffy.
3. Add sugar and continue to cream well for 6 to 8 minutes.
4. Add eggs 1 at a time, beating well after each addition.
5. Add flour and milk alternately to creamed mixture, beginning and ending with flour.
6. Add vanilla and continue to beat until just mixed.
7. Divide batter equally between two 10-inch greased round pans. Level batter in each pan by holding pan 3 or 4-inches above counter, then dropping flat onto counter. Do this several times to release air bubbles and to get a more level top.
8. Bake for 25 to 30 minutes or until a tester or toothpick inserted into the center comes out clean.

Constructing the Cake
1. Allow all elements to cool to room temperature. Cut both cakes in half horizontally with a long knife. A bread knife works well here!
2. Here's where it gets fun! Over a cooling rack, or right on top of a serving plate, place the first layer of cake. Cover generously with a layer of curd, then place another cake on top. Cover with whipped cream, another cake, the remaining curd, then the last cake. Pour the glaze over top and allow to drip over the edges. Top with a few mint sprigs and you're done!

8/8/12

Recipe: Tomato Pie

We’ve been spread pretty thin lately, slowly settling into our new lives here in New Marlborough, so you may have noticed that we’ve been neglecting the blog a little bit. Though our next post is always in the back of our minds it has been a struggle - between a new kitchen and new schedules - to get into a good cooking, picture taking and writing routine. 

But that doesn’t mean we haven’t been busy working on The Butcher and The Baker. On his days off from The Meat Market, Jake has been scouting out new farms to profile (look out for our next Field Trip to Whippoorwill Farm!) and organizing our overflowing kitchen. All the while Silka has been busy in the garden, meeting with lots of people in the local food community and getting us published! It’s been so fun and really exciting... but now here we are, running in circles and getting a little tired of pasta for breakfast, lunch and dinner. 


Now don’t get us wrong, a great pasta with some cheese and seasonal veggies is the best. But we have started to search for, if not new veg, (because really, how can you get sick of summer produce) a new carb-based canvas. Inspired by the one thing we’re never too busy to make - PIE! - Silka decided to skip the spaghetti and make a simple and savory tart with our CSA harvest and veggies from Jake’s father’s garden. 

While we, along with most of the country, have been experiencing a terrible crop-testing drought, Jake’s father's garden is somehow bursting with bright veggies. Everywhere you look there are tons of juicy, golden orbs hanging just waiting to be plucked. Warm off the vine, they are bursting with a bright, sweet flavor. After shoveling a few freshly-picked handfuls into our mouths, we dumped as many as we could into a basket and brought them home where Silka had a roughly rolled-out crust waiting. Piled high with the tomatoes, some onion and thyme, we folded over the edges and threw it into the oven. 


Classic Pie Dough
(The recipe below is for one 8” pie crust. In the case of a rustic tart, we like to make 1.5 times this recipe so there is plenty of dough create a sturdy edge.)

1 cup flour
1 pinch salt
1 stick cold butter, cut into pieces
½ bar of cold cream cheese, cut into pieces (4 oz)

1. Combine dry ingredients into a food processor and pulse until mixed.
2. Add butter and cream cheese and pulse until mixture starts to form a ball, usually 8 - 10 pulses.
3. Turn out onto a floured surface and pat into a 2 inch-thick disc. Wrap in saran wrap and chill for at least 1 hour.


Tomato Pie

1.5 pints of cherry tomatoes, large ones cut in half
½ onion, roughly chopped

½ stick of butter (4 tbsp)1 tbsp fresh thyme
½ tsp sugar
salt and pepper to taste
 

Optional: 
3/4 cup grated cheese - Gruyere or goat would work perfectly!

1. Preheat oven to 400 degrees.
2. On a floured surface, roll out dough to ⅛ in thick and about 12 inches around. Don’t worry about a perfect circle here, rustic shapes work just fine. Place back into the refrigerator.
3. Place onions, with 2 tablespoons of butter, in a large pan on medium heat. Let caramelize, stirring occasionally for 15 minutes.
4. Add a salt and pepper to taste, sugar and thyme, cooking for another 5 minutes.
5. Add remaining 2 tablespoons of butter into the pan and let melt. Add tomatoes and fold into butter to coat. Let cook for an additional 3 minutes, salt and pepper some more, and remove from heat.
6. After the tomato and onion mixture has cooled (10 minutes or so), remove dough from fridge and place on a baking sheet with edges. Pour filling into the center of the dough and gently fold over edges to hold vegetables in.
7. Bake for 40 minutes or until crust is golden and tomatoes start to burst. Sprinkle cheese on top and broil until melted and bubbling. Remove from oven and let sit 10 minutes before serving.

5/1/12

Recipe: Rhubarb Upside-Down Cake

The first fruit of the season isn’t really a fruit at all, but nonetheless it's one of our favorites. Each year around this time, Jake's grandmother Jane would bake up the season's first rhubarb dish and he'd know - with that perfect combination of sweet and tart, and that beautiful pink color - that warmer days were on their way.

We're thrilled to announce that Jane's fortune telling rhubarb patch is now ours. And the responsibility of baking up the long-awaited sweet and sour desserts has fallen to Silka. Each day for the last two weeks, as Jake inspects the progress on Jane's house (also now ours) he has monitored the green-and-pink striped growth, announcing the number of day's until harvest.


Well that day finally came yesterday. And almost instantly, remembering an amazing upside-down cake she read about last year by our imaginary bestie Melissa Clark, Silka went to work. Despite the enormous pressure on her, the cake came out perfectly and is now one of our favorites. Melissa's batter is marked by a bright creamyness that can only be acheived with the best ingredient everrrrrr - sour cream. With any luck strawberries will soon be here and we'll continue on the road to rhubarb overdose with strawberry rhubarb pies and a rhubarb compote.

Rhubarb Upside-Down Cake

+ 2 1/2 sticks unsalted butter, at room temperature, more to grease pans
+ 1 1/2 pounds rhubarb, rinsed and sliced into 1/2-inch cubes (about 4 cups)
+ 2 teaspoons cornstarch
+ 1 1/2 cups granulated sugar 1/2 cup light brown sugar
+ 2 cups cake flour
+ 1 1/4 teaspoons baking powder
+ 1/2 teaspoon fine sea salt
+ Zest of 1 lemon, grated
+ 1 teaspoon vanilla extract
+ 4 large eggs
+ 1/3 cup sour cream
+ 2 teaspoons lemon juice.

1. Heat oven to 325 degrees. Line the bottom of a 9-inch springform pan with parchment paper. Butter the paper and sides of the pan. Wrap two layers of foil under the pan, and place it on a buttered baking sheet.
2. In a medium bowl, mix rhubarb, cornstarch and 1/2 cup granulated sugar.
3. Mix the brown sugar and 1/2 stick butter in a pan over medium heat. Whisk until smooth and bubbling, about 2 minutes. Sift together the cake flour, baking powder and salt.
4. Whip 2 sticks butter in a mixer with a paddle attachment for 2 minutes. With your fingers, blend the remaining 1 cup sugar with lemon zest until the mixture is uniform in color. Cream together with the butter at medium-high speed until it is light and fluffy, about 4 minutes, stopping to scrape down the bowl halfway through. Add the vanilla and mix well. Add the eggs, one at a time, mixing well after each addition. Mix in the sour cream, then the lemon juice. (It’s O.K. if the mixture looks curdled.) With the mixer set to low speed, add the flour mixture, 1/4 cup at a time, until well combined. Scrape down the mixer bowl in between the additions.
5. Pour the brown-sugar mixture into the cake pan, then spoon in the rhubarb and its juices. Spoon in the batter so it covers all of the rhubarb. Smooth out the top.
6. Bake for 1 hour and 15 minutes, or until the top of the cake is firm to touch and a toothpick stuck in the middle comes out without any large, moist crumbs.
7. Place the pan on a wire rack, and cool for 15 minutes. Run a knife around the cake, place a plate on top of the pan and turn it upside-down. Release the cake from the pan while still warm or else it will stick.

4/18/12

Goat Cheese Thumbprint Cookies

On Easter Sunday, we went to our good friend Scottie's house for her festive and sprawling annual brunch. Each dish on the bountiful table was springy and delicious, but the highlight was the smoked ham made from a super-local (like backyard-local) pig. After fully digging in - for maybe too long - Jake realized that one of the regular guests, Susan Sellew of Rawson Brook Farm, wasn’t there and no one knew why.

When Susan walked in an hour later, she recounted her attempt to get to the party on time. On the way over she stopped by her barn and saw that one of the mother goats was having trouble birthing. So she turned around, changed, helped deliver twin kids then changed again and made her way to Scottie's! 


When we finished brunching, we decided to walk the 3.5 miles of back roads back to Susan's farm and see those two-hour old kids ourselves. And whoa! Those baby goats were SO cute! We oooh and ahhhed at them for a long time and finally tore ourselves away, picking up a tub of Susan's fantastic goat cheese on our way out.

Fast forward to yesterday, when Jake "pinned" a recipe for goat cheese thumbprint cookies topped with globs of jam in the middle. They sounded and looked amazing and we knew we had to try them. Silka quickly whipped a batch up, dotting them with her aunt's blueberry jam. The classic Monterey Chevre was the perfect cheese for this sweet and tangy dessert - we can't wait to make it again!

Goat Cheese Thumbprint Cookies

+ 4 ounces unsalted butter, room temp
+ 1 & 1/4 cups sugar
+ zest of 1 lemon
+ 1 egg
+ 1 teaspoon vanilla extract
+ 4 ounces goat cheese
+ 2 & 1/2 cups AP flour
+ 1 teaspoon baking powder
+ 1/2 teaspoon baking soda
+ 1/2 teaspoon salt

1. Cream butter and sugars till light and fluffy. Add egg and vanilla extract. Mix in goat cheese.
2. Sift dry ingredients and zest together & mix into wet ingredients until combined.
3. Scoop cookies using a small scoop (about 1 tbsp) and make a small indentation in the center. Chill cookies for at least 30 minutes before baking.
4. Bake at 325 degrees for 14-16 minutes rotating once halfway through.  If they puff up while baking, just poke the centers with a spoon when you take the out of the oven to get that indentation.
5. Once the cookies have completely cooled, spoon a small amount of blueberry jam in the centers.

3/9/12

Recipe: Classic Welsh Scones

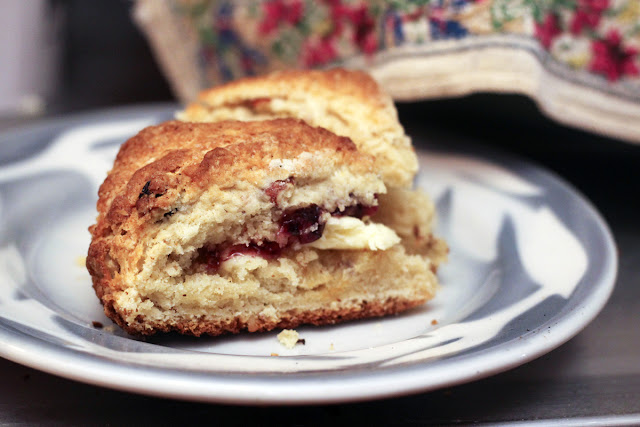
On a lazy weekend morning, nothing makes us happier than a big cup of coffee and something freshly baked. The problem with this equation is that, in your pre-pastry haze, you have to actually “freshly bake” something. Enter scones - the easiest thing ever to make, a catch-all for aging pantry staples, and the perfect not-too-sweet-not-too-savory vessel for butter, cream and jam. Seriously, you could make these in your sleep – which is basically what we did last weekend. 

The morning (ok, ok, afternoon) after a rousing game of Pictionary (ok, ok, we’re waaaay cooler than we sound), Silka rolled out of bed desperate for our favorite scones. And as she slowly flipped rummaged through the pantry, we realized that we’d been holding on to just a handful of raisins, almonds and walnuts. The nuts went into a pan to roast and the raisins into a hot water/left-over whiskey to plump up. After an easy mix of simple ingredients and a quick cooking time we were back on the couch contentedly snacking away and watching bad movies On Demand. Who could ask for more?!  

Welsh Scones
From The Modern Baker by Nick Malgieri

+ 2 1/4 cups All Purpose flour
+ 1/3 cup sugar
+ 1 tbsp baking powder
+ 1 tsp cream of tartar
+ 1/2 tsp salt
+ 8 tbsp (1 stick) cold, unsalted butter cut into 12 pieces
+ 1 large egg
+ 1/2 cup milk

Optional:
+ 1/2 cup of raisins, soaked in a mix of hot water and whiskey for 30 minutes
+ 1/2 cup nuts, roasted and coarsely chopped

1. Set a rack in the middle level of the oven and preheat to 450 degrees.
2. Combine the flour, sugar, baking powder, cream of tartar and salt in the bowl of a food processor fitted with the metal blade. Add the butter and pulse until the mixture is mealy but dry and powdery.
3. Invert the bowl of the food processor over a mixing bowl and carefully remove the blade. If you are adding raisins, nuts or both, gently stir them in now.
4. Quickly whisk the egg and milk together and use a fork to toss the egg mixture into the flour mixture, continuing to toss until all the flour mixture is evenly moistened.
5. Gently knead the dough 3 to 4 times, until it is smooth. Divide the dough in half and pres and pat each half into a disk about 6 inches in diameter. Place the two disks of dough a couple of inches apart on the prepared pan.
6. Use a floured bench scraper or knife to mark each disk of dough into 8 wedges, pressing straight down, and cutting no farther than halfway into the dough disk.
7. Bake the scones until they are very deep golden and firm, 12-15 minutes.
8. Slide each disk of baked scones onto a platter and use a knife to cut them completely along the markings into wedges.
9. Serve with butter, whipped cream and jam!