Showing posts with label Summer. Show all posts

9/27/15

Recipe: Rustic Eggplant Parmesan


This is just the best time of year, isn’t it? The days are hot, the nights are cool, the sky is clear, and the light is sharp. But that’s not all! The peaches are juicy, the apples are crisp, the tomatoes are bursting, the corn is mouthwatering, and the winter squashes are starting to roll in. The Berkshires are at their most beautiful and bountiful. It’s overwhelming really — what does one do with this incredible cornucopia?

Matters are further complicated by the transition in the weather. The days are still too hot to be cooking over the stove, but the evenings are starting to be cool enough that you crave those slow roasted treats absent from plates since March. Not to mention, by this time of the year, you’re a little sick of that char-grilled flavor and you’ve consumed more sliced tomatoes then you thought was humanly possible.


We say, embrace the transition, the back and forth, the thin-line walking. Here’s how to do it: Rustic Eggplant Parmesan. This particular take on the classic Italian-American dish involves almost no prep and maybe even less time in the kitchen, but it still manages to shine with layered flavors of slow roasted tomatoes, earthy eggplant, and creamy melted cheese!

It is the best of both our worlds — hot sticky summer, and cool crisp autumn.

Rustic Eggplant Parmesan

+ 2 medium eggplant (about 2 lbs.) sliced into 1/4-inch-thick rounds
+ ¾ teaspoon kosher salt, more to taste
+ Freshly ground black pepper to taste
+ About ¾ cup extra virgin olive oil
+ 1 head of garlic (6 large cloves) minced or pressed
+ 6 medium tomatoes sliced into 1/4-inch-thick rounds
+ ½ cup finely grated Parmesan
+ 1 lb. fresh mozzarella, sliced into 1/4-inch-thick rounds
+ Handful of basil, chopped if you prefer

1. Place the eggplant slices in a colander over a bowl. Season with 1/2 teaspoon salt and let stand for 20 minutes. Drain and pat slices dry with a paper towel. Season with pepper.
2. Preheat oven to 375 degrees. In a large (9” x 13” works) baking pan, place a single layer of sliced tomatoes, then a single layer of eggplant. Sprinkle with a light coating of olive oil, garlic, and Parmesan cheese.
3. Repeat layering one more time and top with an additional single layer of tomato. Dust with salt and Parmesan.
4. Place in oven. After a half hour, remove pan from oven and cover the dish with the mozzarella, remaining Parmesan cheese, olive oil and salt.
5. Return to oven and cook for another half hour. Serve hot with basil and black pepper sprinkled on top.

Note: This recipe originally appeared on RuralIntelligence.com on September 7, 2015. 

8/10/15

Recipe: Cornbread Panzanella Salad


Few things hit the spot like a great salad on a hot August day. One of our favorite summer salads has already been perfected by not one, but two chefs in Great Barrington — Daire Rooney of the Mezze Restaurant Group and Steve Browning at Prairie Whale. They have different approaches to the dish, but our reaction is always the same; when we see a panzanella salad on either of their menus, we just have to order it.

But sometimes you just want to stay in and make your own, right? Luckily, with panzanella, you can’t go wrong. Just grab a few fresh ingredients, throw ‘em together and you’ve got a bright and satisfying classic summer side dish.


This salad is simple, but also highly adaptable. Don’t like cucumbers? Leave them out. Have some beautiful sweet peppers? Toss them in. Whether you’re picnicking at Tanglewood, dropping by a summer potluck, or just feeling lazy, this salad promises to deliver.


Cornbread Panzanella Salad

+ 4 generous cups of cornbread, cut into 1 inch cubes
+ 2 lbs. heirloom tomatoes, chopped into 1-2 inch pieces
+ 1 fresh tropea onion, minced or 1 shallot, peeled and minced
+ 1 or 2 cucumbers, sliced and chopped
+ 5 tablespoons olive oil
+ Sea salt (something flaky like Maldon is best)
+ Frreshly ground pepper
+ 3 tablespoons balsamic vinegar
+ 4-5 oz. good mozzarella, chopped into ½-inch pieces
+ 1/2 cup basil, roughly chopped

1. Lay the cornbread cubes out on a baking sheet and drizzle about 3 tablespoons of olive oil on top. Toss until the pieces are generally covered, and season lightly with salt and pepper. Bake in a 400° oven for 10 minutes, gently stirring once or twice, until toasted.
2. In a large serving bowl, mix the tomatoes, onions or shallots, cucumbers, vinegar, remaining olive oil, and cheese. Add cornbread cubes and mozzarella, some salt and pepper, and toss.
3. Let sit for 20 minutes or so, then serve.

Note: This recipe originally appeared on RuralIntelligence.com on August 10, 2015. It's been back-dated here on our blog so that it falls, seasonally, in the right place. 

6/15/15

Recipe: Strawberry Icebox Pie

If ramps are the first taste of spring, then strawberries are most certainly the first taste of summer. Each year as we take our first bite of our first strawberry, a sense of joyous relief falls over us and we know that summer is truly here. But like all good things in life, strawberry season goes by in a flash, and it's up to us to make the most of it.

We wanted to celebrate this limited-time-only, ruby-red harvest this week, but when we sat down to work out the recipe, we had no idea where to start. There are just so many delicious, delectable, delightful ways to eat strawberries! Our favorite, of course, is to eat 'em as you pick 'em - but that's not much of a recipe. Other dishes on the list? Strawberry rhubarb pie, strawberry jam, strawberries and cream, strawberries and ice cream, strawberry pancakes, strawberry shortcake... you can imagine it's a very long list.

Anyway, rather than pick just one, we decided to pile as many strawberry preparations as we could into one pie plate, and here's where we landed – Strawberry Icebox Pie. There's something for everyone, and a little bit of everything for us – graham cracker crust, jam, mousse, cream and fresh berries. It looks like a lot of work, but it's not – we promise! And it's worth it. So, so worth it! 

 
Strawberry Icebox Pie
Crust:
+ 15 graham crackers (about 1 ½ cups when crushed)
+ ¾ stick butter, melted
+ 1/3 cup sugar
+ 1 tsp salt

Jam Layer:
+ 1 lb. strawberries, hulled
+ 1⁄3 cup sugar
+ 1 1/2 tablespoons cornstarch

Mousse Layer: 
+ 1 lb. strawberries, hulled
+ 1⁄2 cup sugar
+ 1⁄2 tbsp. lemon juice
+ 1⁄2 tsp. salt
+ 3 eggs, separated into yolks and whites
+ 1 cup heavy cream
+ 1 1⁄2 tsp. vanilla extract

Whipped Cream:
+ 1 cup heavy cream
+ 2 tbsp sugar

Directions:

To make the crust:
1. Preheat oven to 350°.
2. Crush the graham crackers. A food processor is the easiest way, but you can also put the crackers in a heavy zip-lock bag, wrap the bag in a dishtowel, and whack away at it with a rolling pin.
3. Mix all crust ingredients until well-combined. Dump into a buttered 9-inch pie pan or spring-form pan and press firmly onto the bottom and up the sides. (If using a spring form pan, lay parchment paper in the bottom and then butter.)
4. Bake for 10 minutes. Set pan on wire rack to cool.

To make the jam layer:
1. Chop about half of the strawberries into 1/2-inch pieces. Set aside.
2. Put remaining strawberries in a medium saucepan and crush them using a fork. Add sugar and cornstarch to the pan and cook over medium-low heat until mixture comes to a boil.
3. Remove from heat and stir in remaining chopped strawberries. Cool completely.
4. Spread cooled jam in the bottom of the cooled crust. If your jam seems very watery, use a slotted spoon and transfer only the chunky parts. Refrigerate the whole thing – crust and jam - or put in the freezer until cool.

To make the mousse layer:
1. Puree strawberries in a blender or food processor until smooth and transfer to a large saucepan. Add sugar, lemon juice, salt, and egg yolks, then whisk until smooth. Put the saucepan over medium heat and bring to a simmer.
2. Cook, whisking occasionally, for about 15 minutes, or until the mixture has thickened a little. Remove from heat, allow to cool for 10 minutes, then put in the refrigerator until cold – about 30 minutes.
3. Whisk egg whites in a bowl until stiff peaks form and add to cooled strawberry mixture. Fold gently until combined then set aside.
4. Whisk cream and vanilla in a clean bowl until stiff peaks form, add to strawberry mixture. Fold until combined then gently pour into pan, layering on top of cooled jam.
5. Refrigerate the pie or put in the freezer until the mousse sets a bit.

To make the whipped cream:
1. Mix cream and sugar in a bowl. Whip until firm peaks form. Spread over mouse layer. Put in the freezer for a few hours or overnight. One hour before serving, take the cake out of freezer if you're using a spring form pan, release it now) and put in the fridge to thaw slowly. Before serving, top with strawberries.

Note: This recipe originally appeared on RuralIntelligence.com on June 15, 2015. It's been back-dated here on our blog so that it falls, seasonally, in the right place.

8/17/14

Recipe: Corn and Jalapeño Fritters

Nobody’s perfect all the time. We do our best to stick to a seasonal produce schedule, buying locally when we can and often amending recipes or changing culinary tacks when we can’t. But there’s one night, almost weekly, when we fill our grocery carts with abandon, and that’s taco night.

Sure, we do our best. We buy our steak from North Plain Farm and our radishes, cabbage, tomatoes, even jalapeños, from farms around the county. But we just can’t let go of our beloved guacamole, and the avocados and limes that it calls for. It’s a deliciously rebellious treat that we relish—so much so that we often over-buy for our table of two and happily gorge on leftovers for a few extra days.

But we’re always striving to bring it back to the Berkshires. The last couple taco nights we’ve been enjoying these delicious and easy corn fritters. They’re a quick way to get a little more local produce on our plates, and a great off-the-cob vehicle for the corn which is so bountiful and sweet this year. Serve with lime, avo and creme fraiche as a starter, or skip the tortillas all together and pile your taco fillings on top, torta-style. However you do it, you’ll be doing your local farmer a favor while enjoying more global flavor.

Corn and Jalapeño Fritters

+ 2 beaten large eggs
+ 1/4 cup all-purpose flour
+ 2 tablespoons grated Parmesan
+ 1 teaspoon kosher salt
+ 2 cups fresh corn kernels
+ 1 thinly sliced scallion
+ 1 finely chopped seeded jalapeño
+ 2 tablespoons safflower oil (canola will work, too)
+ Flake salt
+ Creme fraiche, avocado and lime, for serving

1. Combine eggs, flour, grated Parmesan, and kosher salt in a food processor. Pulse a few times to mix well.
2. Add corn kernels, scallion, and jalapeño; pulse 2–3 times.
3. Heat oil in pan. When hot, cook heaping tablespoonfuls of batter until golden brown, about 4 minutes per side. Season patties with flake salt and serve with creme fraiche, avocado and lime.

Note: This recipe originally appeared on RuralIntelligence.com on August 17, 2014. It's been back-dated here on our blog so that it falls, seasonally, in the right place. 

7/21/14

Recipe: Currant Syrup + Cosmo

Given our particular affinity for berries, we are lucky to have inherited Jake’s grandmother’s home surrounded by raspberry, currant and gooseberry bushes. This year we added to the patch with hearty low and high-bush blueberries, lingonberries, huckleberries and elderberries sourced from Project Native. And now, we’re smack-dab in the middle of high berry season, with perfectly ripe blueberries, raspberries, currants and gooseberries shouting out for our attention.

Most evenings before dinner, we grab a container and go out to mine our precious jewels from their shrubs. Snacking as we go, we never seem to tire of foraging from own backyard. What makes it back inside is often gobbled up that evening as is, by the handful. Occasionally, with a little extra time and energy, we’ll spoon them over biscuits with cream.

No matter how fast we chomp, though, we always get to a point where we cant keep up with the supply and we have to start preserving. One of our favorite ways to prolong our enjoyment is by making syrups. They are a super-quick and incredibly versatile way to stretch the season — and super yummy as a base for cocktails. Here’s our recipe for a simple currant syrup, which is just as good in a currant Cosmo as it is over vanilla ice cream.

Currant Syrup
+ 2 cups currants
+ 2/3 cup water
+ 4 tablespoons sugar

1. Place all of the ingredients in a small pot and bring to a boil.
2. Once the berries have reached a hard boil, turn down to a gentle simmer and walk away for 30 minutes.
3. Strain the syrup into a jar and, with a spoon, push the remains of the berries through the sieve.

Currant Cosmo
+ 2 oz. vodka
+ 2 oz. currant syrup
+ 1 oz. vermouth
+ juice of one lime

1. Combine ingredients together in a cocktail shaker, shake until cold, and serve with a lime wedge or fresh berries.

Note: This recipe originally appeared on RuralIntelligence.com on July 21, 2014. It's been back-dated here on our blog so that it falls, seasonally, in the right place.

8/9/13

Recipe: Whole Grilled Fish

With Jake's new job as Produce Manager at the Berkshire Co-op Market we have been eating a lot less meat. Instead of bringing home thick pork chops, or a beautifully marbled London Broil every night, Jake is now carting home green and white striped zucchini and deep purple tomatoes. His working at the Co-op has also given us access to something else we've never really ate a lot of: fresh fish!

The main reason we weren't eating a lot of fish is that we never felt sure we were getting the full story - was it fresh? sustainably caught? how far did it travel? do we even know enough to ask the right questions? It's hard to feel like there's full transparency around seafood - sometimes even at the green market.


But now we have Austin Banach and Wes Mazlone! Around the time Jake was hired at the Co-op, so was our friend and fellow Monument High School grad, Austin. Austin is a fish and cheese monger who is just as passionate about his craft, and issues of sustainability and the local food economy, as we are. Lucky for us, he fills his case every week with bounty from Wes. 

Wes grew up in Scituate, Massachusetts, a prominent fishing community, and now lives in North Hampton, MA running BerkShore. Twice a week he drives to Scituate and picks up fish from the dock just caught by guys he grew up with. He then drives the fish back to the Berkshires and delivers it to the Co-op and other local restaurants and markets. On the days that Wes drops his fish off at the Co-op, we almost always take advantage. And now that it is full-on summer, we have become obsessed with grilling his beautiful product whole.

This week Austin had some gorgeous black sea bass in his case. We took the fish, a lemon, some local corn, a few heirloom tomatoes and zucchini, and headed home. After getting the grill going we went out to the herb garden and got some tarragon and parsley out from under the serious weeds that have settled there. Next, easy as one, two, three, we stuffed the cavity of the fish with the herbs and lemon, sprinkled some salt on both sides of the fish, drizzled a little olive oil on top and tossed it on the grill. After four minutes on each side, we were sitting on the porch eatting a stunning, fresh, flavorful meal.

Grilled Whole Fish

+ 1 whole fish (scaled and gutted). Right now we like Black Sea Bass and Porgy. 
+ A handful of fresh herbs (tarragon, parley, cilantro, chervil, and dill are all good)
+ 1 lemon, slice one half, leave the other half intact
+ olive oil
+ salt

1. Stuff the cavity of the fish with the herbs and the lemon slices.
2. Coat it with salt and drizzle a little olive oil on it
3. Put it on the grill and cook for 4 minutes, than flip and cook for another four minutes.
4. Take off the grill and let rest for a few minutes. Before serving squeeze some lemon on it.

7/8/13

Field Trip: Berkshire Food Guild's Midsummer Feast


So we haven’t posted for quite a while (sorry!)... but we have a good reason! We swear! We've really dove head-first into our new lives here in the Berkshires, both personally and professionally, and that's kept us pretty busy. That's why it's fitting that our first blog post in a looooong while should be about the Berkshire Food Guild. 

Since making the big move, we've become deeply involved with the local food culture in the Berkshires, which is incredibly vital and a huge part of why we moved in the first place. In all of our buzzing about, we've been fortunate enough to connect with so many like-minded, energized and talented people. One of things that we love about our new friends is how unfailingly dedicated they are to their respective crafts. They share our belief that revitalizing food-craft traditions is crucial, and inextricably connected to supporting our local foodshed.

And so was born the Berkshire Food Guild, was founded this April by Jake, Jamie Paxton, Jazu Stine, and Jill Jakimetz. 

For their premiere event on June 29th, Jake suggested a Midsummer Feast inspired by our time in Sweden and our love for all things Scandinavian. The BFG was lucky enough to find a partnering farm right away- Mill River Farm, an organic and educational farm right here in New Marlborough, started by our friend Jan Johnson. 

The Midsummer Feast was everything we dreamed it would be. The menu was unusual and exciting, rooted in traditional Scandinavia food, but using all local ingredients. The night started with BFG beverage master Brian Heck pouring biodynamic, natural wines that he imports directly from producers in France. (He later poured coffee he had roasted at his day job: Head Roaster at Barrington Coffee Roasters.) Then, Jan led a tour of her farm, all the while talking about the challenges and joys of sustainable and organic farming. Next, Chef Jamie sent out tray after incredible tray of inventive appetizers like Indian Line pea pesto served on knackebrod that Jill baked using grains from Hawthorne Valley Farm - where she lives and works - that she milled herself. For the main course, Pitmaster Jazu spit-roasted a whole lamb from Kinderhook Farm stuffed with spruce and juniper, while Jamie grilled baby turnips, garlic scapes, and fennel.


The food was delicious, the setting was beautiful, and everyone was in a festive mood... but there were a couple of moments that really, truly made the night a success for us. When Jake and Jazu pulled the lamb off the spit, all of the guests rushed over to watch and ask questions. As Jazu carved the lamb, pointing out the different cuts, and describing what made this lamb so special, the shepherd who had raised the lamb stood proudly by his side. We were blown away by the complete transparency of the meal, and the guests' enthusiastic response to it. 

And then again, at the end of the evening, when Jake asked a departing guest how she felt the event had gone, she said: "Amazing, I have learned so much tonight!" In the end that is our real goal - to further dialogue around the local sustainable food movement. What an inspiring night!

For more photos of the evening, take a look at the BFG's Flickr album full of fantastic shots by the talented Diana Pappas and Tom Bland

9/21/12

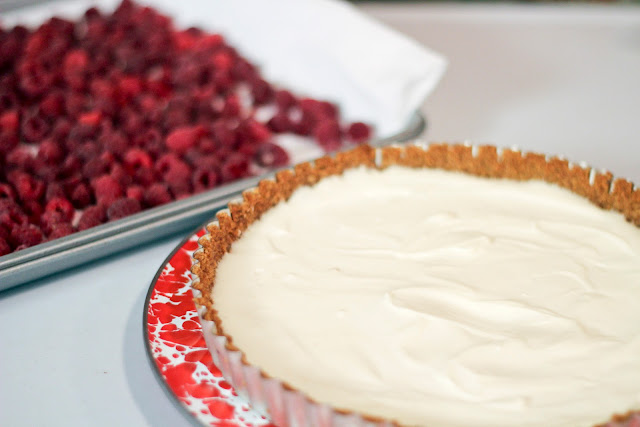
Recipe: Raspberry Sour Cream Tart

We are loving our first September together in New Marlborough – perfect weather, the best produce and the late afternoon light?! Amazing! In fact, we fell so in love with September in the Berkshires that we’ve been inspired to get married here, in our backyard, next fall!! 

Not surprisingly, many of our preliminary wedding-planning conversations revolve around food. Jake works with the most amazing team of caterers at Fire Roasted Catering, The Meat Market’s sister company, so that decision was easy to make. But there’s still the cake. We definitely want to incorporate fruit and since we’re drowning in raspberries right now (in the best way!) we knew they’d be a great, seasonal fruit to celebrate.

 
So why do we have so many raspberries? Decades ago Jake’s grandmother planted two raspberry patches - a summer patch and an autumn patch. As the weather starts to cool and the days get shorter, we feel so lucky to have this incredibly bountiful second harvest! On any given day there is at least a quart of newly ripe, sweet rubies to be plucked.

Ok, back to the wedding! We’ve started to play around with some raspberry dessert ideas, preferably ones that are red and white to match our décor (more on that later!). Through a fruitful Google session, Silka found this beautiful and bright recipe - and while it may not be suitable for our wedding cake, we are so happy to have stumbled upon it! 


Raspberry Sour Cream Tart
Bon Appetit via Epicurious.com

For crust
+ 8 whole graham crackers, coarsely broken
+ 1/4 cup (packed) golden brown sugar
+ 1/4 cup (1/2 stick) unsalted butter, melted

For filling and topping

+ 6 ounces cream cheese, room temperature
+ 1/3 cup sugar
+ 1/2 cup sour cream
+ 2 teaspoons fresh lemon juice
+ 1/2 teaspoon vanilla extract
+ 2 1/2-pint baskets raspberries
+ 1/4 cup seedless raspberry jam

To make crust:
Preheat oven to 375°F. Grind crackers and sugar in processor until coarse crumbs form. Add butter and process until crumbs are evenly moistened. Press crumb mixture firmly onto bottom and up sides of 9-inch-diameter tart pan with removable bottom. Bake until crust is firm to touch, about 8 minutes. Cool crust on rack.

Make filling and topping:
Using electric mixer, beat cream cheese and sugar in medium bowl until smooth. Beat in sour cream, lemon juice and vanilla. Spread filling in cooled crust. Chill until firm, at least 4 hours. (Can be made 1 day ahead. Cover; keep chilled.)

Arrange berries over filling. Whisk jam in small bowl to loose consistency. Drizzle over berries. Serve immediately or chill up to 3 hours.

8/30/12

Recipe: Fettuccine with Green Tomato Sauce

In many ways the summer can feel like one long build-up to that first bright-red, juicy tomato from the garden. For months we spend warm evenings strolling through the garden, checking on the state of our staked fruit, patiently waiting for mid-August. And then! We gorge - tomato sandwiches, caprese salad, salsa, fresh tomato sauce, grilled tomatoes, tomato and cucumber salad, canned tomatoes, tomato jam, you name it! 


But this summer we planted our seedlings a little late. So here we are, in late-August with nothing but a few light-green orbs. Luckily - while nothing compares to that sweetly satisfying first bite of a big red - the truth is that there are plenty of delicious things to do with a green tomato.

With a green tomato’s tart and firm flesh, there is a world beyond the classic fried side (not that there’s anything wrong with fried green tomatoes!). One popular option, seen often in kosher-style delis, is to go the pickle route. But in our house we like to do something else: green tomato sauce over pasta. Sauteed with onions, some cream, and bits of bacon (duh!), green tomatoes are the perfectly acidic base for a mid-summer-going-on-fall sauce.

Fettuccine with Green Tomato Sauce

+ 1 lb bacon, cut into small chunks
+ 3 lbs green tomatoes, cut into small chunks
+ 1 large onion, sliced
+ ½ cup cream
+ 1 lb fettuccine

1. Fry the bacon in a large saute pan. When done, remove bacon and set aside, reserving the bacon fat.
2. Saute the onions over medium-high heat until translucent. Add the tomatoes and cook for about one hour, or until the the tomatoes are soft. Meanwhile boil water for pasta.
3. Cook the pasta and drain. Around this time, add the cream to the sauce and remove from heat.
4. In a serving bowl, pour the sauce over the pasta and sprinkle with bacon.

8/8/12

Recipe: Tomato Pie

We’ve been spread pretty thin lately, slowly settling into our new lives here in New Marlborough, so you may have noticed that we’ve been neglecting the blog a little bit. Though our next post is always in the back of our minds it has been a struggle - between a new kitchen and new schedules - to get into a good cooking, picture taking and writing routine. 

But that doesn’t mean we haven’t been busy working on The Butcher and The Baker. On his days off from The Meat Market, Jake has been scouting out new farms to profile (look out for our next Field Trip to Whippoorwill Farm!) and organizing our overflowing kitchen. All the while Silka has been busy in the garden, meeting with lots of people in the local food community and getting us published! It’s been so fun and really exciting... but now here we are, running in circles and getting a little tired of pasta for breakfast, lunch and dinner. 


Now don’t get us wrong, a great pasta with some cheese and seasonal veggies is the best. But we have started to search for, if not new veg, (because really, how can you get sick of summer produce) a new carb-based canvas. Inspired by the one thing we’re never too busy to make - PIE! - Silka decided to skip the spaghetti and make a simple and savory tart with our CSA harvest and veggies from Jake’s father’s garden. 

While we, along with most of the country, have been experiencing a terrible crop-testing drought, Jake’s father's garden is somehow bursting with bright veggies. Everywhere you look there are tons of juicy, golden orbs hanging just waiting to be plucked. Warm off the vine, they are bursting with a bright, sweet flavor. After shoveling a few freshly-picked handfuls into our mouths, we dumped as many as we could into a basket and brought them home where Silka had a roughly rolled-out crust waiting. Piled high with the tomatoes, some onion and thyme, we folded over the edges and threw it into the oven. 


Classic Pie Dough
(The recipe below is for one 8” pie crust. In the case of a rustic tart, we like to make 1.5 times this recipe so there is plenty of dough create a sturdy edge.)

1 cup flour
1 pinch salt
1 stick cold butter, cut into pieces
½ bar of cold cream cheese, cut into pieces (4 oz)

1. Combine dry ingredients into a food processor and pulse until mixed.
2. Add butter and cream cheese and pulse until mixture starts to form a ball, usually 8 - 10 pulses.
3. Turn out onto a floured surface and pat into a 2 inch-thick disc. Wrap in saran wrap and chill for at least 1 hour.


Tomato Pie

1.5 pints of cherry tomatoes, large ones cut in half
½ onion, roughly chopped

½ stick of butter (4 tbsp)1 tbsp fresh thyme
½ tsp sugar
salt and pepper to taste
 

Optional: 
3/4 cup grated cheese - Gruyere or goat would work perfectly!

1. Preheat oven to 400 degrees.
2. On a floured surface, roll out dough to ⅛ in thick and about 12 inches around. Don’t worry about a perfect circle here, rustic shapes work just fine. Place back into the refrigerator.
3. Place onions, with 2 tablespoons of butter, in a large pan on medium heat. Let caramelize, stirring occasionally for 15 minutes.
4. Add a salt and pepper to taste, sugar and thyme, cooking for another 5 minutes.
5. Add remaining 2 tablespoons of butter into the pan and let melt. Add tomatoes and fold into butter to coat. Let cook for an additional 3 minutes, salt and pepper some more, and remove from heat.
6. After the tomato and onion mixture has cooled (10 minutes or so), remove dough from fridge and place on a baking sheet with edges. Pour filling into the center of the dough and gently fold over edges to hold vegetables in.
7. Bake for 40 minutes or until crust is golden and tomatoes start to burst. Sprinkle cheese on top and broil until melted and bubbling. Remove from oven and let sit 10 minutes before serving.

7/16/12

Recipe: Garlic Scape Pesto

Moving away from the Union Square Green Market has been hard on us, but the “lemonade” is an excuse to join one of the many fabulous CSAs in South Berkshire County. (A little known fact: one of the first CSAs in America was established right here in Egremont, MA; Indian Line Farm was started by Robyn Van En, Jan Vander Tuin and a group of local community members in 1985.) Though it was a tough decision, we decided to go with a work-share at Laura Meister’s Farm Girl Farm, a farm we have admired from afar for years. Obviously we are thrilled to get our hands a little dirty and come home with fresh veg all the way through November. But we’re also excited to see where our weekly bag of goodies takes us and the recipes on this blog.


Sure enough, our first few shares of the year brought curly bundles of bright green garlic scape inspiration. While the first few batches were perfect grilled as a side dish or sauteed into pastas, we thought we would make a pesto out of the late-season scapes and slather it on a grilled chicken. Another selling point: other than the delectable Parmigiano from Rubiner's and the dry Rose Silka insisted on picking up, everything we needed for the meal was in our not-so-well-stocked pantry. A quick grill and a speedy spin of the food processor handed us a gorgeous summer dinner, plus extra pesto to freeze for later.


Garlic Scape Pesto

+ 1 bunch of garlic scapes
+ 1/3 cup pine nuts
+ 1/3 cup finely grated Parmigiano-Reggiano
+ Kosher salt and black pepper
+ 1/3 cup extra-virgin olive oil plus 1 tbs

1. Chop the scapes in to one inch lengths and sautee in a pan with a little olive oil.
2. When the scapes turn a vibrant dark green, and release their aroma, remove from the pan.
3. Puree the garlic scapes, pine nuts, Parmesan, 1/2 teaspoon salt, and 1/4 teaspoon pepper in a food processor until very finely chopped - pulsing works best. Then, with the motor running, slowly pour the oil through the opening. Season the pesto with salt and pepper to taste. Spread on everything!

The pesto keeps in the fridge for 1 week or frozen for a month.

To make our grilled chicken rub the pesto on a butterflied bird then grill as you normally would, “basting” with extra pesto as it cooks. The pesto would also be fabulous on pasta, or as the base of a salad dressing, dipping sauce or aioli.